
Cómo crear un botón bookmark en blogger
En esta publicación, compartiré cómo crear un botón bookmark en Blogger. Los lectores suelen utilizar los marcadores (bookmark) para marcar sitios que les han gustado o les han gustado para leer. Como sabemos, los marcadores son instalaciones presentes en un navegador como Google Chrome, Mozilla, Internet Explorer, Opera y otras aplicaciones de navegador para almacenar la dirección o el nombre de un sitio web y agrupar direcciones URL según el tema o temas especificados para que el lector no ya necesita recordar que la URL del artículo del sitio web es muy larga.
Para acceder rápidamente a la función de marcadores en un navegador, normalmente presione Ctrl+D para agregar la URL del sitio web a la lista de favoritos contenida en el marcador.
En esta ocasión les comparto un tutorial que les puede gustar mucho a la gente, especialmente a los diseñadores y clonadores de plantillas de blogger. Pensé en crear esta función porque vi muchas plantillas de blogger que circulan por todas partes y usan un ícono de marcador en cada una de sus entradas, pero el ícono no es un botón de marcador sino un enlace directo al artículo. Conduce y es un truco de icono simulado como un botón de marcador.
Para realizar el truco para que se convierta en un botón de marcador real, siga los pasos a continuación cuidadosamente para que no ocurran errores o errores durante la instalación.
Al igual que el título de la publicación anterior sobre esta función de marcador, uso el sistema de almacenamiento local como un almacén de actividad del usuario donde este sistema puede almacenar datos del lector como cookies (datos almacenados en el navegador) para agregar una lista de artículos favoritos. El usuario no los perderá al actualizar o cambiar de página en un dominio.
Cómo crear un botón bookmark en Blogger
Paso 1: Primero inicie sesión y abra su cuenta de Blogger.
Paso 2: Ahora haga clic en Menú de temas > Editar HTML.
Paso 3: luego copie el código Css dado y colóquelo encima del archivo //]]></b:skin>.
/* Bookmark Posts Css By miwebperfecta.com */
.bookmark-icon-cont svg{vertical-align:middle;width:22px;height:22px;fill:none!important;stroke:#08102b;stroke-linecap:round;stroke-linejoin:round;stroke-width:1}
.bookmark-count{font-size:11px;line-height:18px;padding:0 5px;border-radius:10px;background:#e6e6e6;color:#08102b;position:absolute;top:-5px;right:-2px;z-index:5}
.bookmark-body{padding:20px}
.bookmark-area{display:flex!important;width:100%;height:100%;position:fixed;top:0;left:0;background:rgb(0 0 0 / 52%);visibility:hidden;opacity:0;transition:all 0.8s ease-in-out;z-index:9999;overflow-y:scroll;backdrop-filter:blur(8px);user-select:none;-webkit-user-select:none;-ms-user-select:none}
.bookmark-area.open{opacity:1;visibility:visible}
.bookmark-area.open .bookmark-main{opacity:1;transform:scale(1);visibility:visible}
.bookmark-main{background:#fff;padding-bottom:15px;display:block;margin:auto;width:calc(100% - 20px);max-width:520px;visibility:hidden;opacity:0;overflow:hidden;transition:all 0.5s ease-in-out;transform:scale(.3);border-radius:6px;box-shadow:0 0 8px 0 rgba(0,0,0,.08)}
.bookmark-main h2{font-size:17px;font-weight:700;color:#08102b;float:left;border-bottom:2px solid #4a4a4a}
.bookmark-close-btn{cursor:pointer;float:right}
.bookmark-head-sec{padding:28px}
.bookmark-head-sec svg{width:20px;height:20px;fill:none!important;stroke:#08102b;stroke-linecap:round;stroke-linejoin:round;stroke-width:1px}
.stm-bookmark-btn,.bookmark-empty-btn{display:inline-flex;align-items:center;margin:0;padding:10px 15px;outline:0;border:0;border-radius:6px;line-height:20px;color:#fefefe;background-color:#482dff;font-size:13px;font-family:inherit;text-decoration:none;white-space:nowrap;overflow:hidden;max-width:100%;cursor:pointer;transition:all 0.3s ease}
.stm-bookmark-btn svg{width:18px;height:18px;fill:none!important;stroke:#fefefe;stroke-linecap:round;stroke-linejoin:round;stroke-width:1px;margin-right:7px}
.bookmark-empty-center{text-align:center;justify-content:center;margin:8px}
.bookmark-empty-center p{font-size:15px;font-weight:600;text-align:center;color:#08102b;margin-bottom:25px}
.bookmark-empty-center svg{width:45px;height:45px;fill:none!important;stroke:#08102b;stroke-linecap:round;stroke-linejoin:round;stroke-width:1px}
.bookmark-empty-btn svg{width:18px;height:18px;fill:none!important;stroke:#fefefe;stroke-linecap:round;stroke-linejoin:round;stroke-width:1px;margin-right:7px}
.bookmark-table{width:100%;border:2px solid #f5f5f5;border-radius:6px;padding:9px;margin-bottom:8px}
.bookmark-table img{border-radius:6px;width:130px;height:60px;border:1px solid #f5f5f5;pointer-events:none}
.bookmark-table a{display:inline-flex;text-decoration:none;color:#08102b;font-size:13px;font-weight:600;margin-left:8px;line-height:20px}
.bookmark-btn-remove svg{width:18px;height:18px;fill:none!important;stroke:#08102b;stroke-linecap:round;stroke-linejoin:round;stroke-width:1px}
.bookmark-btn-remove{cursor:pointer}

/* Dark Mode Css */
.drK .bookmark-icon-cont svg{stroke:#fffdfc}
.drK .bookmark-main{background:#1e1e1e}
.drK .bookmark-main h2{color:#e3e3e3;border-bottom:2px solid #4d4d4d}
.drK .bookmark-head-sec svg{stroke:#e3e3e3}
.drK .bookmark-empty-center p{color:#e3e3e3}
.drK .bookmark-empty-center svg{stroke:#e3e3e3}
.drK .stm-bookmark-btn,.drK .bookmark-empty-btn{color:#e3e3e3}
.drK .stm-bookmark-btn svg,.drK .bookmark-empty-btn svg{stroke:#e3e3e3}
.drK .bookmark-btn-remove svg{stroke:#e3e3e3}
.drK .bookmark-table img{border:none}
.drK .bookmark-table{border:2px solid #4d4d4d}
.drK .bookmark-table a{color:#e3e3e3}
Paso 4: luego copie el código Jquery dado y colóquelo arriba </head>.
<script src='https://ajax.googleapis.com/ajax/libs/jquery/3.5.1/jquery.min.js'/>Paso 5: - Después, copie el código JavaScript principal dado y colóquelo arriba </body>.
<script src='https://scripts.smarttechmukesh.com/bookmark/bookmark-posts-v1.1.js'/>
<script>/*<![CDATA[*/
/*-- Variable Empty Items --*/
var emptyMsg = ('Bookmark Article List Not Available');
var buttonTitle = ('View All Posts');
var buttonLink = ('http://miwebperfecta.com/search');

/*-- Bookmark Title --*/
var bookmarkMsg = ('Bookmark Posts');

/*-- Svg Icons --*/
var closeIcon = ('<svg xmlns="http://www.w3.org/2000/svg" viewBox="0 0 24 24"><circle cx="12" cy="12" r="10"></circle><line x1="15" y1="9" x2="9" y2="15"></line><line x1="15" y1="15" x2="9" y2="9"></line></svg>');
var bookmarkHeartIcon = ('<svg xmlns="http://www.w3.org/2000/svg" viewBox="0 0 24 24"><g><path d="M20.66,12.34l-7.95,8a1,1,0,0,1-1.42,0L3.34,12.34a4.59,4.59,0,0,1,0-6.49l.09-.08a4.59,4.59,0,0,1,5.73-.62l3.05,2,2.59-1.8a4.61,4.61,0,0,1,5.86.53h0A4.59,4.59,0,0,1,20.66,12.34Z"></path></g></svg>');
var removeIcon = ('<svg xmlns="http://www.w3.org/2000/svg" viewBox="0 0 24 24"><line x1="2" y1="6" x2="22" y2="6"></line><path d="M8,6V4a2,2,0,0,1,2-2h4a2,2,0,0,1,2,2V6"></path><line x1="9" y1="10" x2="9" y2="18"></line><line x1="15" y1="10" x2="15" y2="18"></line><path d="M20,6V20a2,2,0,0,1-2,2H6a2,2,0,0,1-2-2V6"></path></svg>');
var linkIcon = ('<svg xmlns="http://www.w3.org/2000/svg" viewBox="0 0 24 24"><path d="M20,13v7a2,2,0,0,1-2,2H4a2,2,0,0,1-2-2V6A2,2,0,0,1,4,4h7"></path><polyline points="16 2 22 2 22 8"></polyline><line x1="12" y1="12" x2="21.6" y2="2.4"></line></svg>');
/*]]>*/</script>
var emptyMsg = ('Bookmark Article List Not Available');
var buttonTitle = ('View All Posts');
var buttonLink = ('http://miwebperfecta.com/search');
/-- Bookmark Title --/
var bookmarkMsg = ('Bookmark Posts');
Puede cambiar toda la parte marcada según su necesidad.
Paso 6: Luego, copie el código Html del botón Agregar publicaciones de marcadores dado y colóquelo arriba <data:post.body/>.
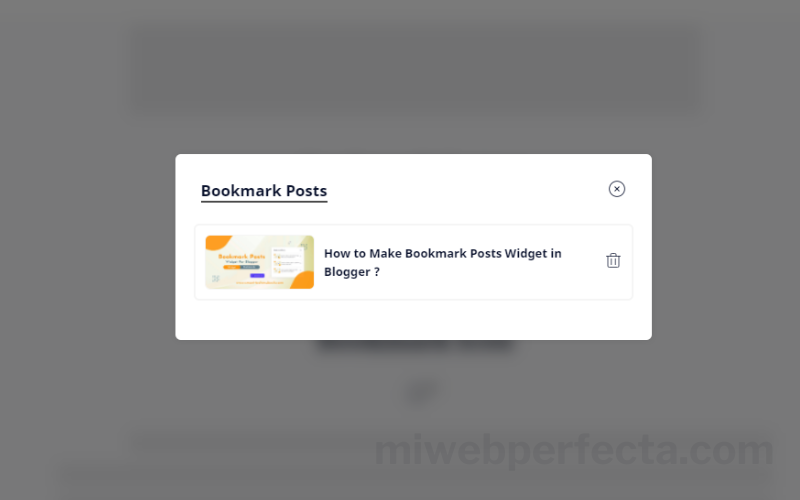
<b:if cond='data:view.isPost'><div style='text-align:center;'><button class='stm-bookmark-btn' data-quantity='1' expr:data-bookmarkimage='resizeImage(data:post.featuredImage, 400, "16:9")' expr:data-id='data:post.id' expr:data-link='data:post.url' expr:data-title='data:post.title'><svg viewBox='0 0 24 24' xmlns='http://www.w3.org/2000/svg'><path d='M18.4,20.8,12,16,5.6,20.8A1,1,0,0,1,4,20V4A2,2,0,0,1,6,2H18a2,2,0,0,1,2,2V20A1,1,0,0,1,18.4,20.8Z'/><line x1='12' x2='12' y1='6' y2='12'/><line x1='15' x2='9' y1='9' y2='9'/></svg> Bookmark Post</button></div></b:if>Paso 7: puede colocar este icono de marcador (abrir y cerrar) donde desee, por ejemplo, puede colocarlo justo encima del encabezado.
<!--[ Bookmark button ]-->
<label class='bookmark-icon-cont stm-open-close'><svg viewBox='0 0 24 24'><g transform='translate(4.500000, 2.500000)'><path d='M7.47024319,0 C1.08324319,0 0.00424318741,0.932 0.00424318741,8.429 C0.00424318741,16.822 -0.152756813,19 1.44324319,19 C3.03824319,19 5.64324319,15.316 7.47024319,15.316 C9.29724319,15.316 11.9022432,19 13.4972432,19 C15.0932432,19 14.9362432,16.822 14.9362432,8.429 C14.9362432,0.932 13.8572432,0 7.47024319,0 Z'/></g></svg><span class='bookmark-count'/></label>
Paso 8: Finalmente, haga clic en Guardar tema y vea el resultado.
Defer Jquery y Main Js para publicaciones de marcadores
<script>/*<![CDATA[*/ function deferJqueryAtOnload(){var d=document.createElement("script");d.src="https://ajax.googleapis.com/ajax/libs/jquery/3.5.1/jquery.min.js",document.body.appendChild(d)}window.addEventListener?window.addEventListener("load",deferJqueryAtOnload,!1):window.attachEvent?window.attachEvent("onload",deferJqueryAtOnload):window.onload=deferJqueryAtOnload; /*]]>*/</script>
<script>/*<![CDATA[*/ function deferBookmarkPosts(){var d=document.createElement("script");d.src="https://scripts.smarttechmukesh.com/bookmark/bookmark-posts-v1.1.js",document.body.appendChild(d)}window.addEventListener?window.addEventListener("load",deferBookmarkPosts,!1):window.attachEvent?window.attachEvent("onload",deferBookmarkPosts):window.onload=deferBookmarkPosts; /*]]>*/</script>
<script>/*<![CDATA[*/
/*-- Variable Empty Items --*/
var emptyMsg = ('Bookmark Article List Not Available');
var buttonTitle = ('View All Posts');
var buttonLink = ('http://miwebperfecta.com/search');

/*-- Bookmark Title --*/
var bookmarkMsg = ('Bookmark Posts');

/*-- Svg Icons --*/
var closeIcon = ('<svg xmlns="http://www.w3.org/2000/svg" viewBox="0 0 24 24"><circle cx="12" cy="12" r="10"></circle><line x1="15" y1="9" x2="9" y2="15"></line><line x1="15" y1="15" x2="9" y2="9"></line></svg>');
var bookmarkHeartIcon = ('<svg xmlns="http://www.w3.org/2000/svg" viewBox="0 0 24 24"><g><path d="M20.66,12.34l-7.95,8a1,1,0,0,1-1.42,0L3.34,12.34a4.59,4.59,0,0,1,0-6.49l.09-.08a4.59,4.59,0,0,1,5.73-.62l3.05,2,2.59-1.8a4.61,4.61,0,0,1,5.86.53h0A4.59,4.59,0,0,1,20.66,12.34Z"></path></g></svg>');
var removeIcon = ('<svg xmlns="http://www.w3.org/2000/svg" viewBox="0 0 24 24"><line x1="2" y1="6" x2="22" y2="6"></line><path d="M8,6V4a2,2,0,0,1,2-2h4a2,2,0,0,1,2,2V6"></path><line x1="9" y1="10" x2="9" y2="18"></line><line x1="15" y1="10" x2="15" y2="18"></line><path d="M20,6V20a2,2,0,0,1-2,2H6a2,2,0,0,1-2-2V6"></path></svg>');
var linkIcon = ('<svg xmlns="http://www.w3.org/2000/svg" viewBox="0 0 24 24"><path d="M20,13v7a2,2,0,0,1-2,2H4a2,2,0,0,1-2-2V6A2,2,0,0,1,4,4h7"></path><polyline points="16 2 22 2 22 8"></polyline><line x1="12" y1="12" x2="21.6" y2="2.4"></line></svg>');
/*]]>*/</script>
Lazyload Jquery y Main Js para publicaciones de marcadores
<script>/*<![CDATA[*/ var lazyJquery=!1;window.addEventListener("scroll",function(){(0!=document.documentElement.scrollTop&&!1===lazyJquery||0!=document.body.scrollTop&&!1===lazyJquery)&&(!function(){var e=document.createElement("script");e.type="text/javascript",e.async=!0,e.src="https://ajax.googleapis.com/ajax/libs/jquery/3.5.1/jquery.min.js";var a=document.getElementsByTagName("script")[0];a.parentNode.insertBefore(e,a)}(),lazyJquery=!0)},!0); /*]]>*/</script>
<script>/*<![CDATA[*/ var bookmarkLazy=!1;window.addEventListener("scroll",function(){(0!=document.documentElement.scrollTop&&!1===bookmarkLazy||0!=document.body.scrollTop&&!1===bookmarkLazy)&&(!function(){var e=document.createElement("script");e.type="text/javascript",e.async=!0,e.src="https://scripts.smarttechmukesh.com/bookmark/bookmark-posts-v1.1.js";var a=document.getElementsByTagName("script")[0];a.parentNode.insertBefore(e,a)}(),bookmarkLazy=!0)},!0); /*]]>*/</script><script>/*<![CDATA[*/
/*-- Variable Empty Items --*/
var emptyMsg = ('Bookmark Article List Not Available');
var buttonTitle = ('View All Posts');
var buttonLink = ('http://miwebperfecta.com/search');

/*-- Bookmark Title --*/
var bookmarkMsg = ('Bookmark Posts');

/*-- Svg Icons --*/
var closeIcon = ('<svg xmlns="http://www.w3.org/2000/svg" viewBox="0 0 24 24"><circle cx="12" cy="12" r="10"></circle><line x1="15" y1="9" x2="9" y2="15"></line><line x1="15" y1="15" x2="9" y2="9"></line></svg>');
var bookmarkHeartIcon = ('<svg xmlns="http://www.w3.org/2000/svg" viewBox="0 0 24 24"><g><path d="M20.66,12.34l-7.95,8a1,1,0,0,1-1.42,0L3.34,12.34a4.59,4.59,0,0,1,0-6.49l.09-.08a4.59,4.59,0,0,1,5.73-.62l3.05,2,2.59-1.8a4.61,4.61,0,0,1,5.86.53h0A4.59,4.59,0,0,1,20.66,12.34Z"></path></g></svg>');
var removeIcon = ('<svg xmlns="http://www.w3.org/2000/svg" viewBox="0 0 24 24"><line x1="2" y1="6" x2="22" y2="6"></line><path d="M8,6V4a2,2,0,0,1,2-2h4a2,2,0,0,1,2,2V6"></path><line x1="9" y1="10" x2="9" y2="18"></line><line x1="15" y1="10" x2="15" y2="18"></line><path d="M20,6V20a2,2,0,0,1-2,2H6a2,2,0,0,1-2-2V6"></path></svg>');
var linkIcon = ('<svg xmlns="http://www.w3.org/2000/svg" viewBox="0 0 24 24"><path d="M20,13v7a2,2,0,0,1-2,2H4a2,2,0,0,1-2-2V6A2,2,0,0,1,4,4h7"></path><polyline points="16 2 22 2 22 8"></polyline><line x1="12" y1="12" x2="21.6" y2="2.4"></line></svg>');
/*]]>*/</script>
¿Cómo agregar el widget de bookmark en Median UI v1.6?
Especialmente hice este widget de publicación de marcador solo para el usuario medio de la plantilla de blogger de ui. Pero también hemos compartido su método anteriormente para otros usuarios de bloggers. Ahora compartiré cómo instalar este widget en la plantilla de Blogger de IU mediana.
En este widget, hemos creado tres tipos de JavaScript que incluyen: predeterminado, de lazy load y diferido. Puede usar cualquiera de estos, pero creemos que es mejor usar Lazy Loaded JS.
Paso 1: Primero inicie sesión y abra su cuenta de Blogger.
Paso 2: Ahora haga clic en Menú de temas > Editar HTML.
Paso 3: luego copie el código Css dado y colóquelo encima del archivo //]]></b:skin>
/* Bookmark Posts Css By miwebperfecta.Com */
.bookmark-icon-cont svg{vertical-align:middle;width:22px;height:22px;fill:none!important;stroke:#08102b;stroke-linecap:round;stroke-linejoin:round;stroke-width:1}
.bookmark-count{font-size:11px;line-height:18px;padding:0 5px;border-radius:10px;background:#e6e6e6;color:#08102b;position:absolute;top:-5px;right:-2px;z-index:5}
.bookmark-body{padding:20px}
.bookmark-area{display:flex!important;width:100%;height:100%;position:fixed;top:0;left:0;background:rgb(0 0 0 / 52%);visibility:hidden;opacity:0;transition:all 0.8s ease-in-out;z-index:9999;overflow-y:scroll;backdrop-filter:blur(8px);user-select:none;-webkit-user-select:none;-ms-user-select:none}
.bookmark-area.open{opacity:1;visibility:visible}
.bookmark-area.open .bookmark-main{opacity:1;transform:scale(1);visibility:visible}
.bookmark-main{background:#fff;padding-bottom:15px;display:block;margin:auto;width:calc(100% - 20px);max-width:520px;visibility:hidden;opacity:0;overflow:hidden;transition:all 0.5s ease-in-out;transform:scale(.3);border-radius:6px;box-shadow:0 0 8px 0 rgba(0,0,0,.08)}
.bookmark-main h2{font-size:17px;font-weight:700;color:#08102b;float:left;border-bottom:2px solid #4a4a4a}
.bookmark-close-btn{cursor:pointer;float:right}
.bookmark-head-sec{padding:28px}
.bookmark-head-sec svg{width:20px;height:20px;fill:none!important;stroke:#08102b;stroke-linecap:round;stroke-linejoin:round;stroke-width:1px}
.stm-bookmark-btn,.bookmark-empty-btn{display:inline-flex;align-items:center;margin:0;padding:10px 15px;outline:0;border:0;border-radius:6px;line-height:20px;color:#fefefe;background-color:#482dff;font-size:13px;font-family:inherit;text-decoration:none;white-space:nowrap;overflow:hidden;max-width:100%;cursor:pointer;transition:all 0.3s ease}
.stm-bookmark-btn svg{width:18px;height:18px;fill:none!important;stroke:#fefefe;stroke-linecap:round;stroke-linejoin:round;stroke-width:1px;margin-right:7px}
.bookmark-empty-center{text-align:center;justify-content:center;margin:8px}
.bookmark-empty-center p{font-size:15px;font-weight:600;text-align:center;color:#08102b;margin-bottom:25px}
.bookmark-empty-center svg{width:45px;height:45px;fill:none!important;stroke:#08102b;stroke-linecap:round;stroke-linejoin:round;stroke-width:1px}
.bookmark-empty-btn svg{width:18px;height:18px;fill:none!important;stroke:#fefefe;stroke-linecap:round;stroke-linejoin:round;stroke-width:1px;margin-right:7px}
.bookmark-table{width:100%;border:2px solid #f5f5f5;border-radius:6px;padding:9px;margin-bottom:8px}
.bookmark-table img{border-radius:6px;width:130px;height:60px;border:1px solid #f5f5f5;pointer-events:none}
.bookmark-table a{display:inline-flex;text-decoration:none;color:#08102b;font-size:13px;font-weight:600;margin-left:8px;line-height:20px}
.bookmark-btn-remove svg{width:18px;height:18px;fill:none!important;stroke:#08102b;stroke-linecap:round;stroke-linejoin:round;stroke-width:1px}
.bookmark-btn-remove{cursor:pointer}

/* Dark Mode Css */
.drK .bookmark-icon-cont svg{stroke:#fffdfc}
.drK .bookmark-main{background:#1e1e1e}
.drK .bookmark-main h2{color:#e3e3e3;border-bottom:2px solid #4d4d4d}
.drK .bookmark-head-sec svg{stroke:#e3e3e3}
.drK .bookmark-empty-center p{color:#e3e3e3}
.drK .bookmark-empty-center svg{stroke:#e3e3e3}
.drK .stm-bookmark-btn,.drK .bookmark-empty-btn{color:#e3e3e3}
.drK .stm-bookmark-btn svg,.drK .bookmark-empty-btn svg{stroke:#e3e3e3}
.drK .bookmark-btn-remove svg{stroke:#e3e3e3}
.drK .bookmark-table img{border:none}
.drK .bookmark-table{border:2px solid #4d4d4d}
.drK .bookmark-table a{color:#e3e3e3}
Paso 4: Luego copie el código Lazyload Jquery dado y colóquelo arriba </head>.
<script>/*<![CDATA[*/ var lazyJquery=!1;window.addEventListener("scroll",function(){(0!=document.documentElement.scrollTop&&!1===lazyJquery||0!=document.body.scrollTop&&!1===lazyJquery)&&(!function(){var e=document.createElement("script");e.type="text/javascript",e.async=!0,e.src="https://ajax.googleapis.com/ajax/libs/jquery/3.5.1/jquery.min.js";var a=document.getElementsByTagName("script")[0];a.parentNode.insertBefore(e,a)}(),lazyJquery=!0)},!0); /*]]>*/</script>Paso 5: Después, copie el código JavaScript principal y colóquelo arriba </body>.
<script>/*<![CDATA[*/ var bookmarkLazy=!1;window.addEventListener("scroll",function(){(0!=document.documentElement.scrollTop&&!1===bookmarkLazy||0!=document.body.scrollTop&&!1===bookmarkLazy)&&(!function(){var e=document.createElement("script");e.type="text/javascript",e.async=!0,e.src="https://scripts.smarttechmukesh.com/bookmark/bookmark-posts-v1.1.js";var a=document.getElementsByTagName("script")[0];a.parentNode.insertBefore(e,a)}(),bookmarkLazy=!0)},!0); /*]]>*/</script>
<script>/*<![CDATA[*/
/*-- Variable Empty Items --*/
var emptyMsg = ('Bookmark Article List Not Available');
var buttonTitle = ('View All Posts');
var buttonLink = ('http://miwebperfecta.com/search');

/*-- Bookmark Title --*/
var bookmarkMsg = ('Bookmark Posts');

/*-- Svg Icons --*/
var closeIcon = ('<svg xmlns="http://www.w3.org/2000/svg" viewBox="0 0 24 24"><circle cx="12" cy="12" r="10"></circle><line x1="15" y1="9" x2="9" y2="15"></line><line x1="15" y1="15" x2="9" y2="9"></line></svg>');
var bookmarkHeartIcon = ('<svg xmlns="http://www.w3.org/2000/svg" viewBox="0 0 24 24"><g><path d="M20.66,12.34l-7.95,8a1,1,0,0,1-1.42,0L3.34,12.34a4.59,4.59,0,0,1,0-6.49l.09-.08a4.59,4.59,0,0,1,5.73-.62l3.05,2,2.59-1.8a4.61,4.61,0,0,1,5.86.53h0A4.59,4.59,0,0,1,20.66,12.34Z"></path></g></svg>');
var removeIcon = ('<svg xmlns="http://www.w3.org/2000/svg" viewBox="0 0 24 24"><line x1="2" y1="6" x2="22" y2="6"></line><path d="M8,6V4a2,2,0,0,1,2-2h4a2,2,0,0,1,2,2V6"></path><line x1="9" y1="10" x2="9" y2="18"></line><line x1="15" y1="10" x2="15" y2="18"></line><path d="M20,6V20a2,2,0,0,1-2,2H6a2,2,0,0,1-2-2V6"></path></svg>');
var linkIcon = ('<svg xmlns="http://www.w3.org/2000/svg" viewBox="0 0 24 24"><path d="M20,13v7a2,2,0,0,1-2,2H4a2,2,0,0,1-2-2V6A2,2,0,0,1,4,4h7"></path><polyline points="16 2 22 2 22 8"></polyline><line x1="12" y1="12" x2="21.6" y2="2.4"></line></svg>');
/*]]>*/</script>
var emptyMsg = ('Bookmark Article List Not Available');
var buttonTitle = ('View All Posts');
var buttonLink = ('http://miwebperfecta.com/search');
/-- Bookmark Title --/
var bookmarkMsg = ('Bookmark Posts');
Puede cambiar toda la parte marcada según su necesidad.
Paso 6: Luego, copie el código Html del botón Agregar publicaciones de marcadores dado y colóquelo arriba <data:post.body/>.
<b:if cond='data:view.isPost'><div style='text-align:center;'><button class='stm-bookmark-btn' data-quantity='1' expr:data-bookmarkimage='resizeImage(data:post.featuredImage, 400, "16:9")' expr:data-id='data:post.id' expr:data-link='data:post.url' expr:data-title='data:post.title'><svg viewBox='0 0 24 24' xmlns='http://www.w3.org/2000/svg'><path d='M18.4,20.8,12,16,5.6,20.8A1,1,0,0,1,4,20V4A2,2,0,0,1,6,2H18a2,2,0,0,1,2,2V20A1,1,0,0,1,18.4,20.8Z'/><line x1='12' x2='12' y1='6' y2='12'/><line x1='15' x2='9' y1='9' y2='9'/></svg> Bookmark Post</button></div></b:if>Paso 7: Luego busque la ID del widget TextList000 y pegue el código HTML dado
<!--[ Bookmark button ]-->
<li>
<label aria-label='Bookmark' class='bookmark-icon-cont stm-open-close tIc bIc'>
<svg class='line' viewBox='0 0 24 24'><g transform='translate(4.500000, 2.500000)'><path d='M7.47024319,0 C1.08324319,0 0.00424318741,0.932 0.00424318741,8.429 C0.00424318741,16.822 -0.152756813,19 1.44324319,19 C3.03824319,19 5.64324319,15.316 7.47024319,15.316 C9.29724319,15.316 11.9022432,19 13.4972432,19 C15.0932432,19 14.9362432,16.822 14.9362432,8.429 C14.9362432,0.932 13.8572432,0 7.47024319,0 Z'></path></g></svg>
</label><span class='bookmark-count'></span>
</li>
Paso 8: Finalmente, haga clic en Guardar tema y vea el resultado.
Conclusión
Esta es una manera fácil de crear un bookmark en Blogger con almacenamiento local que puede usar en su sitio web de Blogger o en cualquier proyecto de diseño web.
En esta publicación, compartí cómo hacer un widget de bookmark o publicación de marcador en Blogger con almacenamiento local. Espero que este método pueda ser muy útil para usted y su blog. Gracias por visitar nuestro sitio Web.
 Robby dice:
Que grande !
 Bertie dice:
interesante blog
 Diego dice:
Que grande !
 Rubye dice:
interesante blog
 Opal dice:
Tiene una interfaz de usuario escalonada y asegura una descarga más rápida.
 Alena dice:
Que grande !
Deja una respuesta
interesante blog